After installing Exchange Server you have to do various configuration and adjustments to start sending and receiving mails in Exchange 2010. Here I will show you steps to configure Exchange Server to send and receive outside email.
Configure Exchange Server to Send and Receive Outside Email
Open Exchange Management Console from Exchange Server that you have just installed. Expand Organization Configuration on Microsoft Exchange On-Premises and select Hub Transport. In the main windows select Accepted Domains.
Accepted Domains are very first thing that you need to configure in Exchange Server. By placing domain name in Accept Domains, you are telling Exchange Server to accept SMTP messages destined for users that have this domain name in their email addresses.

As you can see I already have mustbegeek.com as Authoritative accepted domain. This domain is created automatically because Hub Transport automatically creates this default domain based on name of forest root domain. If your forest root domain is different from your public SMTP name then you have to add that SMTP domain name. You can add new accepted domain by clicking Add New Accepted Domain in Actions pane. For example, if the organization has mailboxes with SMTP name of xyz.com then you have to add xyz.com in Accepted Domains tab.
After configuring Accepted Domains, now let’s configure Send Connectors. Click Send Connectors tab in the same window after selecting Hub Transport under Organization Configuration. Send Connectors in Hub Transport Server are used to send mail out on the Internet to domains like gmail, hotmail, and so on. By default, there is no any send connectors configured. So click the New Send Connector option in actions pane to add.

Type the name for the send connector. Choose Internet option from the drop down menu and click Next button.

Now click the add button to add address space. Since you will be sending to any destination email type the asterisk (*) key. Check include all subdomains and click OK button. Now click the Next button.

Select the first option if you wish to route mail automatically. This option uses DNS MX records to find the destination mail box in the internet. Select second option if you want to route mail via your ISP’s smart host or other smart hosts. Here I will choose the first option. Click Next button after choosing the network setting.

Select the source server. By default, the server you are currently working on will be displayed here. If you want other Hub Transport server then click the Add button and add other server. But here I will leave the default and click Next button.

Here you will see the summary of the configuration. If you want to edit then click back button.
After configuring the Send Connectors, now lets configure Mail box for users. Expand Recipient Configuration and click Mailbox. Click New Mailbox option in the Actions pane.

Choose user mailbox and click Next button.

Select existing users and click Add button to add users from AD users. Then click Next button.

In the Mailbox settings dialog box, you can configure the custom setting or leave the defaults. I will leave the defaults here. Now click Next button. Then click new button to start the process. After finishing the configuration process click Finish button.
You can now access your mailbox from Outlook Web Access (use https) or Microsoft Outlook application.
You may also like -
 Installing DHCP Role in Windows Server 2012 R2
 Steps to Install VMware vSphere ESXi 6.7
 Install DNS Server Role in Windows Server 2012 R2
 Prerequisites of installing Exchange 2016
 Install and Configure VMware ESXi 6.0
 Install Exchange 2016 in Windows Server 2012 R2
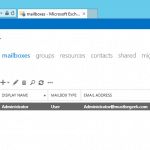 Install Exchange Server 2013 SP1 in Windows Server 2012 R2
Latest posts by Bipin (see all)
- Install Exchange 2019 in Windows Server 2019 - November 28, 2020
- Why Backup your Microsoft Office 365 - November 27, 2020
- What’s New in VMware vSphere 7 - September 18, 2020