Mapping network drive is convenient way to access shared folder on a network. You can manually map a network drive in a PC. But if you want shared folder that’s shared from File Server to be accessible by group of users or a department then it makes more sense to setup network drive mapping using Group Policy from Active Directory server. You can also map network drive for users using logon script. This article shows steps to map network drive using Group Policy. In order to use Group Policy you need to have Domain Controller server in a network.
How to Map Network Drive using Group Policy Preference
In this scenario, Domain Controller is installed on Windows Server 2012 R2 named asaputra-dc1, and a client running Windows 10 is joined to domain asaputra.com. A folder in DC is shared to the network with UNC path \\asaputra-dc1\GlobalShared. This example shows how you can map this shared folder to the domain joined machine.
Step 1. Create GPO object
Open Group Policy Management Console (GPMC) in a domain controller to create a new GPO. Here, I have named it “Global OS” as shown below.

Step 2. Modify GPO Settings
Right click on the policy object and select Edit. The policy that we’re looking for is under User Configuration > Preferences > Windows Settings > Drive Maps, see picture below for reference.

Right click on Drive Maps and select New > Mapped Drive as shown in below:

Step 3. Configure Drive Properties
The prompt window to create drive mapping will appear

On the Action drop down menu, there are four types of action:
- Create: This action will create a new mapped drive for user
- Replace: This action will delete the specified mapped drive, if it exist, and then re-create a new mapped drive. If the mapped drive is not exist, this action will create a new mapped drive for user.
- Update: This action will modify the configuration of the specified mapped drive, if it exist. If the mapped drive is not exist, this action will create a new mapped drive for user.
- Delete: This action will delete a specified mapped drive for user
Other settings are available here are explained below:
- Location: Specify the location of the network drive in UNC path format
- Reconnect: If you tick the box, the drive will be persistent. Otherwise, it will be removed on user logoff.
- Label as: Specify the name of the mapped drive. If you don’t, it will use the folder name by default.
- Drive letter: Assign the drive letter to be used. There are two options here, you can choose either to automatically assign the first available letter or directly assign a letter to the mapped drive.
- Connect as: Specify the credential to be used here if the mapped drives requires different username than the current logged on user
- Hide/show this drive: Decide if you want to make this mapped drive shown or hidden in Windows Explorer
- Hide/show all drives: Decide if you want to make all physical and mapped drives to be shown or hidden in Windows Explorer.
Following the scenario explained above, our configuration looks like this, location is the UNC path of the shared folder, label is the drive name or shared folder name that end user will see once its mapped and drive letter can be first available or you can manually assign one.

We leave all other settings as default. Click OK to save the settings.
4. Apply to the user OU
Since this is a user setting, the GPO must be applied to OU where user accounts resides. But in this example we will just going to link it to the domain root because we want it to be applied globally to all user OUs.

When the policy is applied successfully, the mapped network drive will appear on the client drive list

Troubleshooting tips
Mapped network drive will show up almost instantly when the policy has been refreshed. The command gpupdate /force can always be used to force the Group Policy update and expedite the network drive mapping. If mapped drive fails to appear, first thing to do make sure the policy has been applied correctly to the user account. You can check policy being applied to the user by issuing gpresult /r on Command Prompt.

In our example, drive maps setting is configured in a policy object named “Global OS” and we can see that it has been applied correctly. If policy has been applied but network drive is still not mapped, then the next thing to do is to make sure the assigned drive letter is not already in use for manual mapping.
Note that drive maps actions are all based on the drive letter. Action “Create” and “Update” will not work if the drive letter already in use. In this case, the action “Delete” or “Replace” might be helpful. And that’s how to map network drive using Group Policy preferences.
You may also like -
 Map Network Drive Using Item Level Targeting
 Configure Internet Site Zone using Group Policy Preferences
 Backup and Restore Group Policy Object in Windows
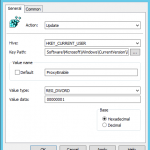 Configure Proxy Settings using Group Policy Preferences
 Block GPO using Delegation Option in Windows
 Configure Windows Firewall Rule using Group Policy
 Hide Control Panel Items using Group Policy
Arranda Saputra
Latest posts by Arranda Saputra (see all)
- How to Move Documents Folder in Windows 10 - August 31, 2020
- How to Move Desktop Folder in Windows 10 - August 31, 2020
- Restore DHCP Server in Windows Server 2012 R2 - January 9, 2020